I’ve been looking for information on how to remove the glove box of my car and the job seemed to be a little bit complicated. Anyway, I’ve found a DIY (Do It Yourself) article which describes the process in a very simple way. The steps turned out to be very easy, (not as I thought in the beginning). I hope you guys will like this DIY and find it useful. The article was originally posted on www.e36coupe.com but I found it here in came you may want to take a look.
For the benefit of anyone out there that is having as much difficulty as I did in removing their glovebox (and then locating the “grommet” that allows you to run power lines from your fuse box to head unit etc.), I’ve produced a picture-rich how-to guide.
Ok, there are three different configurations of glovebox. Two (I think) correspond to those cars without a passenger airbag. The main differences for these and the type I describe below are:
1) neither have a retaining bolt (E) behind the interior glovebox light
2) the vents themselves (but not the entire assembly) may be pulled off to allow access to the screws A and B in the diagrams below
3) you may have to remove the kick panel by the door
I can’t give exact descriptions for these, since I don’t have that type of glovebox!
Anyway, first things first, let’s look at the glovebox as it is and locate the screws we need to remove:
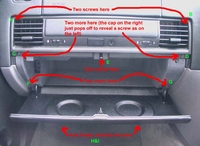
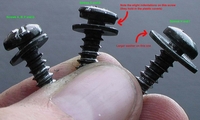
There are three different type of screws, together with E, which is a 10mm bolt (I think it was 10mm – can’t quite remember now). It is important to get the correct screws back in the correct places, otherwise the plastic caps over screws C and D will not go back on. The three screw types look like this:
I’d recommend removing screws H and I first of all, since it’s easier to do this with the glovebox door closed. They’re under the glovebox (you should be able to feel them – they’re more or less where screws F and G are, except beneath the actual glovebox, and a little way back).
Next, I’d take off screws A and B – they’re pretty easy to do, as long as you have a reasonably long, thin screwdriver. They are in the top left & right corners of the left & right passenger vents, respectively:
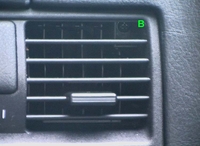
Then we can remove the vent assembly by taking off the plastic caps for screws C and D (in the picture above, screw D still has the plastic cap on) and then removing the screws beneath. The vent assembly should then just pull out; there are a couple of clips, but with a couple of seconds of patience, it comes off pretty easily. Then we’re left with the glovebox itself:
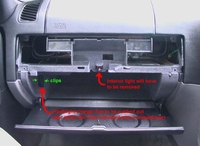
This is retained my the two remaining screws near the hinges and the bolt that is hidden under the interior light. In addition to these, there are two wires that supply power to the interior light and flashlight charger that need to be removed. First the interior light:
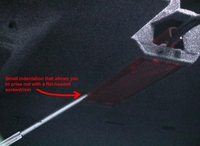
The interior light is very easy to remove when you find the indentation that is on the left edge, at the back of the light. Prise the light out with a flat bladed screwdriver. Be careful when removing the light itself now, and be sure to disconnect the power lines from the back. In the middle of the recess that held the interior light, there should be a 10mm (I think) bolt, which holds the glovebox onto the metal chassis supporting the airbag assembly. Locate this bolt with your fingers and then, using a wrench (I doubt you’ll be able to get to it using a spanner), unscrew the bolt.
Now we can remove the final two screws by the hinges, which can be removed with either an offset screwdriver or a long regular screwdriver:
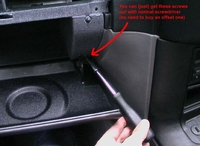
Now, the whole glovebox interior should begin to pull out. The only thing left to do is to pull the interior light clear and remove the flashlight charger. Press the clips indicated on the picture earlier with a flat-bladed screwdriver, and pull the back of the charger connector:
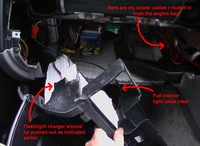
Now we have access to the electrics, should you wish to meddle. While we’re here, I can show you how to get to the mystical grommet that allows access to the engine bay (I routed some dedicated 20 Amp power lines for my Alpine head unit this way). Remove the horizontal kick panel just under the glovebox by pulling (it was secured by screws H and I, which we removed at the beginning of this process):
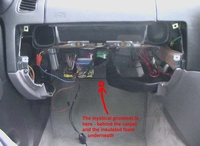
As you can see from the picture above, the access hole is beneath the carpet (not the mat, but the actual carpet – it just pulls back if you tug it hard enough) and under its attached heat-retardent foam. It is covered by a round plastic cover (which, incidentally is an exact fit over the cigarette lighter – I’ve now used that to make my car a no-smoking one!). This plastic cover just pulls off, revealing a hole. If you put your finger inside this hole you should feel a metal pipe running upwards (I think it was at about 270° to 315°). If you push a red (or other brightly coloured cable) up here, you should see it appear eventually in the engine bay. Note that if you want to run a black cable as well (and I can see the reason for only running one cable, personally), I’d recommend taping the end of the cables together and pushing them up together. This saves time, and the black cable is very hard to spot when it comes out in the engine bay. Power can then be routed from the fuse box connector (just under the lid of the box – held by a 12mm bolt, I think, and requires a 10mm ring connector on the red cable) and the chassis bolt near the air filter (8mm bolt I think, needing a 6mm ring connector on the black).
As for the other end of the power cables, this may be obvious advice, but I’d STRONGLY recommend using female connectors (bullets are perfect). The last thing you want is to use exposed males that end up touching and shorting out the fuse box!
Once you’re done, the reassembly is a relatively easy task. However, in order to make sure your glovebox closes do not just reverse the order in which you did everything. The reason being is that the vent assembly (that clips on above the glovebox) has four plastic clips that will almost certainly not fully latch on to the glovebox interior.
First of all, if you’ve removed the horizontal kickpanel below the glovebox, reattach this (although do not screw it back in yet, since these screws also hold the bottom of the glovebox, which you have not put back yet). Now, take the vent assembly and turn it over so you’re looking at the back. You should see four clips, two small ones at the top of the assembly and two wider ones at the bottom. Chances are, the ones at the bottom have been bent outwards (away from the rest of the vent assembly) when you removed the plastic unit.
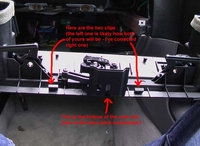
Carefully bend back the clip so that it forms an 80 or so degree angle (rather than the 100+ degree angle it was after removing the assembly). The picture below should make it clearer.
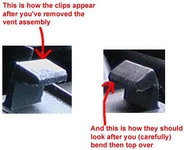
Once you’ve bent the bottom clips over, you’re ready to mount the vent assembly on to the glovebox interior (you need to do this before screwing the interior back in to make sure all four clips have taken). Now, reattach the combined glovebox interior and vent assembly into the hole (be careful to make sure the prongs at the bottom of the glovebox fit back inside the horizontal kickpanel piece). I then screwed back bolt E (into the hole left by the interior light), since on mine this required a bit of play in the glovebox to get the thing back into the hole. Then, it’s a simple matter of replacing all the remaining screws. Be careful when putting screws A and B back, as the screws can end up falling inside the vents. Make sure you close the vents first, and just take your time. If the vents are closed, you should be able to retrieve any dropped screws without having to remove the whole unit.
Finally, your reassembled glovebox should look as good as (or better than) new. Congratulations!
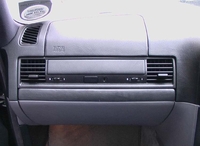
Are you looking for more do it yourself procedures (DIY) ? I recommend the Bentley BMW 3 series service manual for you. I got it and I think it’s a gold mine for us -BMW E36 Owners-. If you didn’t grab your copy yet, get it right now! I’m sure you’ll find this book worth every penny you’ve paid for. Get the Bentley BMW 3 series service manual
Tony Sticks.



 (4.86 out of 5)
 (4.07 out of 5)


