This is the second post in the series of how to create a device to turn your BMW lights on automatically when it gets dark. In the first post Turning Your BMW Lights On Automatically At Night, we’ve seen how it is possible to control a light using an electronic circuit that is sensitive to light. In that post, the idea was to create a circuit that will turn your BMW lights on when it gets dark and the videos proved to you that this can be done.
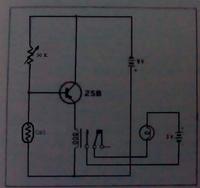
Today, I found the electronic circuit that can be used to create such a controller device. Take a look at this and please excuse the bad quality of the photo, I had to take it with my mobile camera instead of a scanner (it’s from a book):

Now for those of you who do not know anything about electronics, here’s an explanation:
To build this circuit, you will need the following:
1. PnP Transistor.
2. Battery (No, don’t buy one, you already have it under the hood).
3. Relay.
4. Variable Resistor (50 Kilo Ω (Ohms))
5. Light Sensitive Resistor.
Now, to understand how this circuit works, simply imagine the transistor as a switch that can be operated electrically by applying current to its base (the point in the middle), so, when we apply current to the transistor base, it will close the circuit on the other two points. This means that the battery and the relay will be in a closed circuit which makes the relay trigger and then turn the car lights on.
Now, how can we use light to trigger the transistor base? It’s simple. The resistance of the light sensitive resistor changes according to the light intensity. Its resistance becomes almost zero (0 Ohms) when there’s light and it becomes very high when it’s dark. So, using this circuit, the light sensitive resistor will trigger the transistor base when it’s dark.
I’m sure that you’re asking what is the benefit of the variable resistor, right? It’s used to control how sensitive this circuit is going to be for light. So, if you find that the car lights are being too sensitive, try to adjust this variable resistor and this problem will be fixed.
I hope you liked this second part of the series, please have a magnificent day guys and remember to stay tuned for the next posts on the BMW E36 Blog.
Update: I have reviewed the electronic circuit one more time and it seems that it has a problem, I’ve changed the circuit from the original post and I also changed the needed parts to implement it.
BMW E36 Blog: The Ultimate E36 Information Source.


 (4.86 out of 5)
 (4.07 out of 5)


