Fixing BMW E36 Odometer LCD . . . DIY!
This DIY (Do It Yourself) is a contribution from David Mc. I’ve found it on the Bimmerfest forum and I asked David for permission to publish the DIY on the BMW E36 Blog. He was so kind to allow me to republish it here. The procedure shows how the odometer LCD can be fixed. I’ve written previously about how to fix the BMW E36 odometer backlight, but this is how to fix the LCD, not the light, so pay attention to the difference.
Disclaimer: Use this info at your own risk!! I’m not responsible if this didn’t work for you :-).
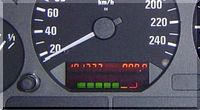
This is the problem – only the top half of the odometer and trip meter is displayed. It is a backlit LCD device but the two blubs illuminate the odometer and service indicator respectively.
Since only the top half of the odometer is displayed the problem is obviously with the LCD and not the bulbs. Commonly this is an intermittent but annoying problem.
Begin by removing the cluster – the first step is to disconnect the battery, then undo the two torx screws on top of the housing and use a credit card to loosen and wiggle the cluster out of the dash. As soon as it is clear, reach behind the cluster and undo the three electrical connectors by first depressing the tabs then sliding the retainer up until the connector is released.
Make sure that you face your work surface with a towel to avoid scratching the cluster, then after removing the five torx screws from the back of the rear housing, carefully separate the gauges from the SI board.
Mark out the area of interest – I used white tape and then cut carefully with a piece of hacksaw blade. You could use a Dremel or even a hobby knife heated with a torch for this job.
There is a fair bit of clearance between the cover and the board but I would suggest extreme caution as you cut down the side of the housing toward the board as there are a couple of tracks that run across the board at this point and a slip here could cause big problems.
I worked carefully and completed the cut within about half an hour using a hacksaw blade – my modelling saw would have made life much easier if only I could remember what I did with it.
After removing the cut section carefully dress the edges of the cut area with a small file to remove burrs, then use a small paint brush and low pressure compressed air to clean the debris from the board.
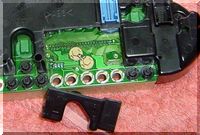
Notice that there are also couple of little gold colored torx screws which secure the SI LCD to the board. Check that they are snug but do not over-tighten them. The idea is to make sure that all the electrical connections are firm, not to cause fractures in the board by over-tightening the components.
I used a hot pencil tipped soldering iron to reflow all of the SI board pins, then carefully replaced the cut cover section using 5 minute epoxy. Apply the epoxy carefully to the cut edges of the housing. Then once its back in place use a rag soaked with turpentine to remove the excess.
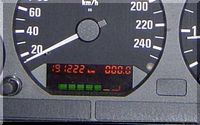
All that was left was to install the cluster back into the car, reconnect the connectors, battery and re-enter the radio code and it was up and running!
A heck of a lot cheaper than a new or even a used cluster and I didn’t have to worry about recoding or it displaying incorrect mileage.
Are you looking for more do it yourself procedures (DIY) ? I recommend the Bentley BMW 3 series service manual for you. I got it and I think it’s a gold mine for us -BMW E36 Owners-. If you didn’t grab your copy yet, get it right now! I’m sure you’ll find this book worth every penny you’ve paid for. Get the Bentley BMW 3 series service manual
BMW E36 Blog: The ultimate BMW E36 information source.

Want to receive exciting tips & information about BMW E36 cars? Enter your Email:-
posted in Do It Yourself, Electrical, Tips & Tricks, Uncategorized | 3 Comments


 (4.86 out of 5)
 (4.07 out of 5)


