Fixing BMW E36 door panel!
posted in Do It Yourself, Interior, Technical Info, Tips & Tricks |Hi Friends,
The door panels in BMW E36 and especially the coupe type is a very common problem that every owner will sooner or later face. As you might have guessed I’m facing this problem right now with my babe :-(. So it’s time to fix it, but I realized that I don’t have any knowledge about the issue, so how am I supposed to fix it. Well, as usual, I will go out and dig to find some people who faced this problem before me and successfully solved it. I’ve found this post which describes the process in detail and I thought I should share it with you guys. Maybe you’d like to do the same to your cars.
Note: don’t forget to buy some clips before starting the surgery, otherwise you will fail to do the job successfully. Good luck!
Disclaimer: Use this procedure at your own risk!! I’m not responsible for your mistakes man! 😀
This is a simple way to fix you sagging or lose door card. I spent about 10 min doing everything, the only catch is that you will need to let the
adhesive cure or dry.
Removal: The panel is fastened by clips and screws, there are 2 screws tucked behind the handle on the arm rest, simply pop the covers off and unscrew them, after that just pull the door card off and unplug the speakers, the speaker wires pull right out, don’t be to
aggressive though as you may damage them.
Things you’ll need once the door panel is off:
Pliers, and RTV silicone.
This is what it looked like before I took it off the car
This is what the repair did
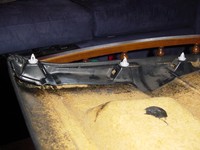
Once I examined the door I found what the cause was. There is a plastic molding holding the door clips that was glued to the door card and had separated itself due to many opening and closings.
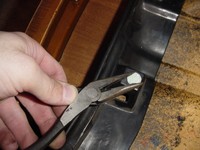
Some of the clips were broken as well. I recommend purchasing new ones from the dealer, don’t be a cheap wad. You should have these clips before the repair so that you can do everything at once. To remove the clips simply wist and pull them with pliers, they are notched and are designed to be done that way.
Remove the clips before you decide to apply the adhesive as this may cause some issues later on in the repair. To put new clips in, just twist them in with your fingers, it doesn’t take much effort.
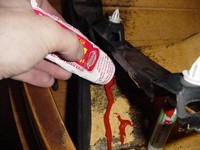
Next you simply apply the adhesive thoroughly. Cleaning shouldn’t really be an issue, but if you decide to clean the area, use a mild soap and warm water. Push down on the plastic to spread the silicone around, you don’t need to smooth it, let the plastic do the work for you, plus you don’t get dirty.
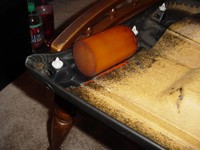
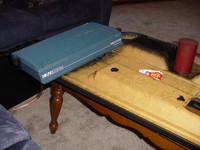
That’s pretty much it for the repair, the next thing you’ll want to do is apply pressure. I chose to use a piece of cylinder poly and laid my amp on it. You’ll want to have adequate pressure to ensure a tight bond. When you add the weight, have the door panel somewhere that will be out of ways harm. I chose the coffee table….
Let the RTV dry before you mount it back on the car. I let mine sit over night just to be safe. Simply reverse the removal process to re-attach the door panel…and your finished
Hope this helps, it’s super easy and cheap, it’s not the most interesting thing in the world but I needed it fixed so I’m sure someone else does to. If you guys think I left something out then let me know but I think I covered everything.
Are you looking for more do it yourself procedures (DIY) ? I recommend the Bentley BMW 3 series service manual for you. I got it and I think it’s a gold mine for us -BMW E36 Owners-. If you didn’t grab your copy yet, get it right now! I’m sure you’ll find this book worth every penny you’ve paid for. Get the Bentley BMW 3 series service manual
Wait for more from . . . BMW E36 Blog
Best regards,
Tony Sticks.
Related Posts:-

Want to receive exciting tips & information about BMW E36 cars? Enter your Email:-




 (4.86 out of 5)
 (4.07 out of 5)


posted on November 6th, 2007 at 9:03 pm
posted on November 6th, 2007 at 11:22 pm
posted on November 20th, 2007 at 10:52 pm
posted on November 21st, 2007 at 1:41 am
posted on February 6th, 2008 at 1:01 am
posted on February 9th, 2008 at 1:08 pm
posted on May 12th, 2008 at 12:59 am
posted on May 12th, 2008 at 9:26 am
posted on May 13th, 2008 at 3:34 am
posted on May 13th, 2008 at 10:36 am
posted on March 9th, 2009 at 4:45 pm
posted on March 10th, 2009 at 9:00 am
posted on June 23rd, 2011 at 1:03 pm
posted on March 18th, 2012 at 7:01 pm